How to turn on closed captioning and live transcription
Prerequisites
- Closed captioning
- Zoom desktop client (enter or view captions)
- Windows: version 3.5.37712.0111 or higher
- macOS: version 3.5.37712.0111 or higher
- Linux: version 3.5.37712.0111 or higher
- Windows: version 3.5.37712.0111 or higher
- Zoom mobile app (view captions only)
- Android: version 4.0.21521.0116 or higher
- iOS: version 4.0.21521.0116 or higher
- Android: version 4.0.21521.0116 or higher
- Zoom desktop client (enter or view captions)
- Live transcription
- Account type: Pro, Business, Education, Enterprise
Note: Approved K-12 accounts and other accounts upon request can also have access to this feature. - Zoom desktop client for Windows, macOS: version 5.0.2 or higher
- Zoom mobile app for Android and iOS: version 5.0.2 or higher
- Account type: Pro, Business, Education, Enterprise
Enabling closed caption
Account
- Sign in to the Zoom web portal a zoom.us
- Click the Meeting tab>In Meeting (advanced)
- Verify that Closed Caption is enabled.
- If the setting is disabled, click the toggle to enable it. If a verification dialog displays, click Turn On to verify the change.
- (Optional) If you want to make this setting mandatory for all users in your account, click the lock icon
 , and then click Lock to confirm the setting.
 - With Closed Captioning enabled, the option to enable live transcription should appear directly below as Enable live transcription service to show transcript on the side panel in-meeting. Check this to enable live transcription.
Group
- Sign in to the Zoom web portal.
- In the navigation panel, click User Management then Group Management.
- Click the applicable group name from the list, then click the Settings tab.
- Click the Meeting tab.
- Verify that Closed Caption is enabled.
- If the setting is disabled, click the toggle to enable it. If a verification dialog displays, click Turn On to verify the change.
Note: If the option is grayed out, it has been locked at the account level and needs to be changed at that level. - (Optional) If you want to make this setting mandatory for all users in the group, click the lock icon
 , and then click Lock to confirm the setting.
 - With Closed Captioning enabled, the option to enable live transcription should appear directly below as Enable live transcription service to show transcript on the side panel in-meeting. Check this to enable live transcription.
User
To enable the closed captioning for your own use:
- Sign in to the Zoom web portal.
- In the navigation panel, click Settings.
- Click the Meeting tab.
- Verify that Closed Caption is enabled.
- If the setting is disabled, click the toggle to enable it. If a verification dialog displays, click Turn On to verify the change.
Note: If the option is grayed out, it has been locked at either the group or account level. You need to contact your Zoom admin. - With Closed Captioning enabled, the option to enable live transcription should appear directly below as Enable live transcription service to show transcript on the side panel in-meeting. Check this to enable live transcription.
Starting manual closed captioning or live transcription in a meeting
- In a Zoom meeting or webinar that you are hosting, click Closed Caption
 or Live Transcript
  , if that feature is enabled.
 - Choose one of these options:

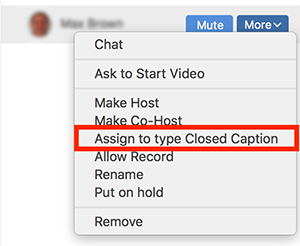
- Assign a participant to type: Opens the participants window. Hover over the participant's name and click More then Assign to Type Closed Caption.

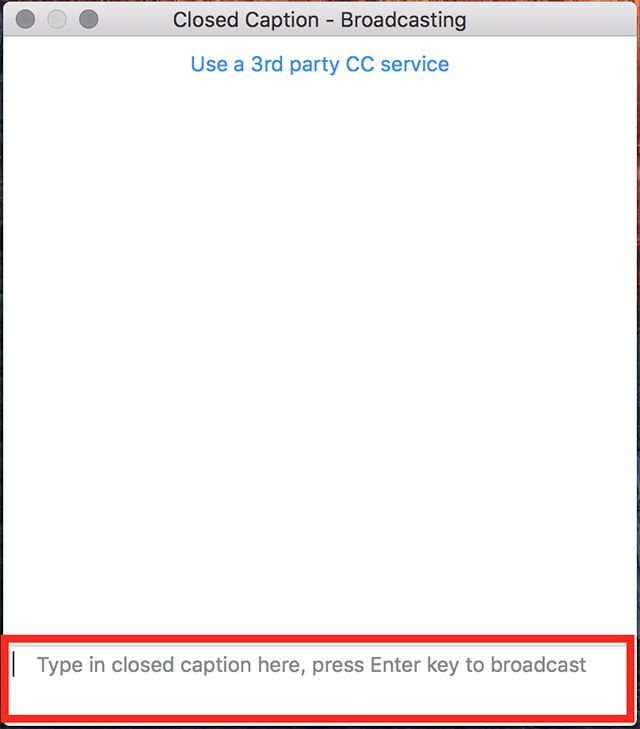
- I will type: Opens the closed captioning window for you to manually type closed captions.

- Copy the API token: Copy the URL that you can provide to a third-party closed captioning service to integrate the service with your meeting.
- Enable Auto-Transcription: Allows the system to start providing live transcription. Participants will be notified that this service is available. This option is only available if enabled in web sett
Related Articles
Zoom Phone FAQ
Zoom Phone FAQ ZOOM PHONE INFORMATION Q: What is required to use Zoom Phone? An SDSUid Zoom account The Zoom app (local application, not a web browser) An Internet connection Q: Are there costs for activating new lines of service? A: Cost will be ...How to Join a Meeting
From Desktop Application 1. Make sure Zoom Desktop application is installed on your computer. 2. Select Join a Meeting (You can enter a meeting with or without signing in). 3. "Join" window appears. Enter Meeting ID or Personal Link Name* ...Setting up Zoom Phone
Getting Started When you get your Zoom Phone license, you will get an email notification with a link to set up Zoom Phone. Click the link at the bottom of the email notification. If you didn't get an email, sign into the Zoom web portal ...How to Require a Password to Join your Meeting
1. Login to your Zoom account at sdsu.zoom.us 2. Once logged in, on the left column of the screen, select Settings 3. In the Settings page, under the "Schedule Meeting" section, enable the Require a password when scheduling new meetings setting 4. ...How to Create and use a Meeting Template
1. Schedule and save a meeting with all of your desired settings selected (required registration, co-hosts added, etc.) 2. Login to Zoom at sdsu.zoom.us 3. Your Zoom profile appears, on the left hand column select Meetings. Select the previously ...